

How To Remove Single Speed Freewheel Without Tool
This article will discuss removing freewheels that take no removal tool option. This will be useful if the cycle is to exist reused, just it will effectively destroy the freewheel. For wheels that are damaged with these types of freewheels, information technology is all-time to merely replace both the complete bike and freewheel.
1
Procedure
What Tools practise I need?
- Pin Spanner SPA-2 or SPA-6
- Punch and hammer (as choice to pin spanner)
- Bench vise
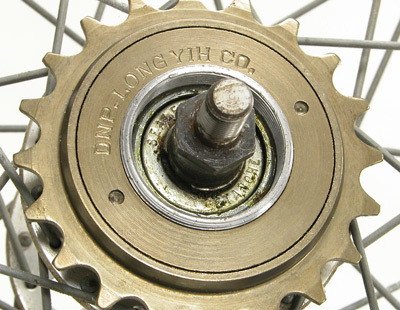
There are also current models of freewheels that exercise not take an acceptable design for removal. If the paradigm below, the freewheel has ii very narrow and shallow notches that practise non allow plenty purchase for a tool. In the image below, removal would likely effect in ruining the tool, the freewheel, or both.

Freewheels are ratcheting mechanisms with an inner and outer body. The inner body is threaded to the hub vanquish with right-mitt threads. The sprockets are fixed to the outer body. Ball bearings allow the two body parts to rotate, while pawls and teeth in the body let it to freewheel and so drive when the pedals are turned. The process below takes the freewheel autonomously for removal. Information technology is very difficult to reassemble the freewheel successfully, and so the freewheel is only replaced.
The process of destructive freewheel removal is below:
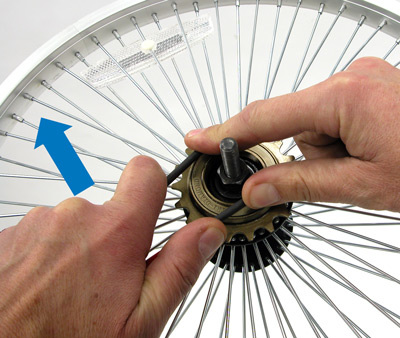
- Remove the bicycle from the bicycle, and remove the quick-release skewer or beam nuts (if not-quick-release type).
- Inspecting freewheel carefully. It is all-time to use the right tool when available. See Cassette and Cog Removal for diverse Park Tool options.
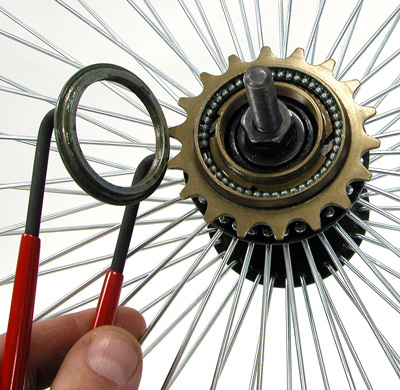
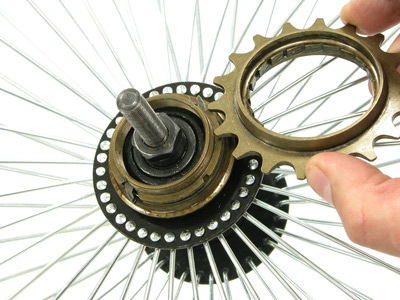
- Inspect freewheel for bearing cone. The cone will typically have pivot holes. Use a pin spanner such as the SPA-2. The cone of the freewheel is a left-hand thread. Turn it clockwise to remove. The cone is typically very tight. Hold spanner snug to freewheel while turning. Alternatively, information technology is possible to use a small tipped punch and hammer to drive the cone clockwise.
Plow freewheel cone clockwise
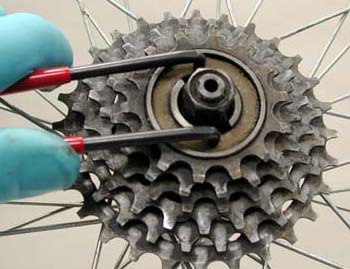
Multiple gear freewheel also use cone with pin holes
- Remove cone completely. Inside will be brawl bearings, pawls and springs.
- The ball bearings and pawls should now be removed. Lift the outer body of the freewheel off. Begetting will fall out. Inner body is now exposed.
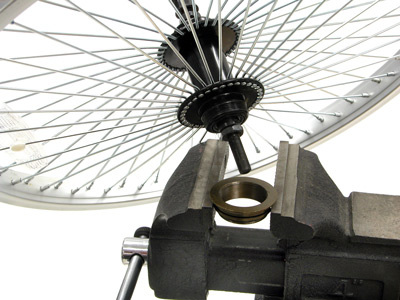
- The inner body is threaded clockwise onto the hub beat out. Look on inner torso for two flats created by pawls. Grab the body firmly on these flats in a vise and plow cycle counter-clockwise.

- Dispose of the freewheel parts and install a new 1.

How To Remove Single Speed Freewheel Without Tool,
Source: https://www.parktool.com/blog/repair-help/freewheel-destructive-removal
Posted by: hodgesrepia1985.blogspot.com
0 Response to "How To Remove Single Speed Freewheel Without Tool"
Post a Comment