

How To Remove Car Wash Swirls
As some of the regular readers of my web log volition know, I recently bought a new ( to me ) car. If not you tin read nigh information technology on a previous postal service here.
This was a dream car for me which I found in the exact spec that I was looking for ( admitting information technology was a long wait to detect the perfect 1 ). This car was second hand with one previous possessor. As with whatsoever second-hand car, the paintwork is not always in 100% perfect condition. This can be downwards to previous owners non using the correct washing and drying methods when maintaining their machine.

Me being VERY particular well-nigh my cars paintwork, it was time for me to put in some time to get my cars paint back to a standard I am happy with. To the everyday person and the untrained eye, the paint looks to be in not bad condition and information technology is actually hard to tell under natural lighting conditions that there are whatsoever issues.
The main problem I am seeing with my TTRS paintwork is light swirling covering the motorcar.
Just equally an example, here is the same spot ( the rear wing ) of the car under different lighting conditions.


It'south astonishing what the right lighting will show upwardly on the car'southward paintwork. Information technology looks similar a completely different car/colour.
Here is some other example of Swirling and minor scratches on the roof of the motorcar. Nasty correct? If your car looks similar this and you want to get it back to a super polished and swirl-gratuitous finish, you can follow my beginners guide for removing swirls below.

Beginners Machine Polishing Guide – How to Remove Swirls from Your Paint!
The process of removing swirl marks from a car's paintwork is actually quite a straightforward job, that I believe anyone tin do thing how much experience y'all have in detailing. It is also quite rewarding and you feel a sense of achievement once consummate.
Y'all can have pride that y'all are single-handedly responsible for your car looking as skilful every bit it does in one case y'all take finished.
Broken downwards to its most basic steps, the procedure for a beginner to smoothen a car is equally follows
1.Deep Clean and Remove Contaminants from the Surface of the Car
Before y'all go anywhere virtually your cars pigment with a polisher, you need to make sure the surface of the auto is completely free of any contaminants such every bit tar or road crud. I volition go into this step in more than particular below but the products you will demand are as follows
- A Adept Wash Hand
- Machine Shampoo
- Clay Bar
- Fe/Fallout Remover
- Bug and Tar Remover ( May non be necessary depending on the cars current condition )
- A Microfiber Drying Towel
two.Remove Swirls and Defects Using a Compound/Polish
- Auto Polisher ( DA Polisher Preferred for Beginners )
- Y'all Can notice some of my recommendations for machine polishers Hither
- Compound and or Polish ( Depending on the severity of the Defects )
- Cutting/Polishing Pads
- Microfiber Buffing Cloths
- Masking Tape ( Non 100% Necessary but preferred )
3.Protect The Auto Using A Wax, Sealant or Coating of Your Choice
- Selection a good quality sealant/wax/coating to protect your swirl-gratis terminate
Some professional detailers may say you need a few more steps or products to get the job done ( For case Snowing Foaming the Car in the Prep Stage ) While these are more "Nice to Haves" they are not 100% Necessary as you are going to exist post-obit up with a Polishing step later. In my stance, the more time yous can spend with the polishing machine the better the results will be. As much as I want to tell you that it is a quick process, unfortunately, it'south not. Depending on the size of your car, you may want to dedicate ane-2 full days to complete the swirl removal process completely, depending on the severity of the swirls in your car'south pigment.
Ok, so you accept the products required? Let'due south get into the detail of the swirl removal and polishing steps.
Recommended Reading – What is the best car polisher for beginners?
Step ane – Preparing the car for Polishing
The very first step you must complete before you can start machine polishing your machine is a full launder and decontamination of the paintwork. This pace is extremely important as your machine must exist costless from all contaminants before yous brainstorm.
Exist certain to thoroughly clean the vehicle to remove any dirt, debris, bugs, leaves, etc. All of this gets in the style of polishing, and if there'southward any dirt or debris left on the surface, it can become defenseless in the pad while polishing and you could risk doing more than damage than good.
i.1 Start past rinsing your automobile with water. Next, you should work your manner effectually the car with a good quality fe remover such as Iron Ten or Iron Out and Spray it on any areas you feel need to exist treated – this will help remove all of the fallout from your cars paintwork.
You volition see this working as the product volition react with the fe particles and start to "Drain". You lot should then rinse the car once again before moving to the next step.


1.2 It'south now fourth dimension to motility on to the next stage of paint decontamination which is claying. This will remove any embedded contaminants in the paintwork. Detailing dirt is specifically designed to glide effortlessly over the surface of your cars paint and take hold of anything that protrudes from the surface. The particles that it glides over stick to the clay bar and is and then removed from your vehicle. By washing alone, these particles will not exist removed from paintwork. If you are unsure of how to clay your car you can jump to my guide hither

1.3 Once you accept completed the fallout and dirt removal steps you should move on to a total handwash of the motorcar using a good quality car shampoo. The one I tend to recommend to people is K-Launder by Gtechniq, as I discover information technology gives great lubrication over the machine's paintwork as y'all are washing.
Pay close attention when you are washing the automobile and make sure you remove all dirt from the surface. Once you have worked your mode effectually the car with the launder mitt, you can and then rinse the car a final time.

1.4 In one case you take the wash stage complete, proceed to dry the car using a practiced quality microfiber towel. Y'all desire the intendance to be totally dry before beginning the polishing step.

Step 2 – Shine The Auto Remove Swirls and Defects
There are several dissimilar approaches you can accept when trying to remove swirl marks from your car. Generally, for light to moderate swirls, you can choose to do either a i Footstep or a 2 footstep correction. ( Depending on the severity of the defects )
What is the difference betwixt a i step and a ii step correction?
- 1 Footstep = Using only i Polish/Compound and 1 Type of Pad.
- ii Step = Using ane Heavier Cutting Compound + Pad on the initial correction of the pigment, and post-obit up with the Second Pace of Refining with a Smoothen & Polishing Pad. ( This can usually accomplish ameliorate results, merely tin take a lot longer to complete )
Sometimes you can achieve the correction results you want with one polishing pace, simply most times, for more severe corrections, information technology takes 2 steps. Information technology is one of those things you cannot be certain of until yous do it.
If you are not certain what type of pad to use on your car while polishing, I accept written a full guide on Hex-Logic Pads HERE
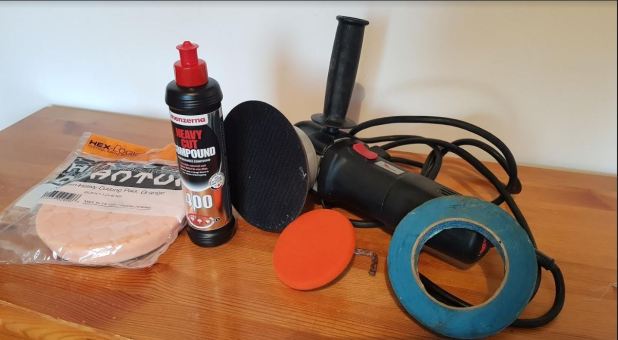
Due to the paint of my TTRS non being in too bad of a condition, I have called to become for a 1 Footstep Correction Using a Medium ( Orange ) Hex Logic Pad, paired with Menzerna 400 Compound ( Formerly Fast Gloss ). The Beauty of Menzerna 400 is that it combines the cutting power of a heavy compound but has the ability to cease with a very high level of gloss. This, in my opinion, is one of the best 1 Stride Combinations you can go for and is definitely what I would recommend to nigh people undertaking lite to moderate swirl removal who want to do it in a reasonably curt space of time.
ii.1 The kickoff thing I usually exercise before starting to polish a car is to get some masking tape and cover upwards any areas you do not want to become shine residue on, such as plastic bits or drinking glass trims. The white residual is a pain in the ass to remove later on, so you lot are all-time roofing these before y'all begin! Believe me, you will thank me after!

2.ii For the outset use of a polishing pad I tend to put a flake extra polish on the pad to prime the pad. I don't like the idea of a dry pad spinning on the paintwork, so I tend to utilize a scrap extra earlier coming into contact with the pigment for the beginning couple of passes. Before I would even consider turning on the polisher, I will always spread it out on the paintwork first, this will minimize the spatter and the sling of the polish.


Annotation! : Exercise not EVER switch the polisher on when yous have polish on the pad and you lot are not in contact with the paint. This is one sure manner to cover yourself and the surrounding area in polish!!!
2.3Place the polisher on the pigment and set it to a speed of 1 and start spreading the polish around the expanse you intend to piece of work on. I tend to work in a 2 ft. ten 2 ft area of the pigment at a time. Most people who are not too experienced tend to try work in very large areas at a time, which does not tend to give great results.
You demand to let the Compound/Polish do its thing, so you should exist working very slowly and making multiple passes over the aforementioned area of paint. To achieve the best effect, I unremarkably set the polisher to a speed setting of 3 of 4, as this tends to exist the best speed for correction ( Don't make the mistake of cranking it upwardly every bit loftier as information technology will go straight abroad, more speed does not mean better results )
Some other error I have seen people make is to use as well much downwards pressure on the polisher. For the all-time correction results, the polisher must be spinning freely on the paint, so only very little pressure is needed. ( On areas like the bonnet or roof, I tend to leave the smoothen work nigh under its own weight )
2.4 Once yous accept made multiple passes over the same area using a speed setting of 3 or iv, yous can then begin to increment the speed of the polisher. I find that this helps the refining stage of a 1 step procedure until the compound is completely broken down. Once you are happy that the smoothen has washed its chore, you lot can buff off the remainder with a microfiber towel or buffing cloth. This will remove any of the remaining residues on the machine'south pigment.
If like me, you don't have a fancy detailing studio you can employ something like an LED torch to check how the paint is looking after you accept finished a section. This will help you somewhat in identifying whatever remaining swirls or spots you may have missed. This is definitely a handy tool to conduct along with you every bit yous progress around the car.

As I was working my way around the car, I noticed a fairly big scratch that I had not seen before and I was adequately shocked. How could I not accept spotted this! However, I had full confidence in the Menzerna 400 and the Orange Pad and I knew that it wouldn't pose much of a problem for the combo. The beneath 2 pictures volition requite y'all an thought of how skillful a 1 pace polish can exist. A couple of passes and the scratch was almost completely invisible.


Pretty Impressive huh? Here is a shot of when I had finished the rear quarter panel, drivers door and one-half of the roof. You can tell straight away that there is a noticeably deeper gloss to the car'due south paintwork. Any scrap of light or reflection is just popping. Slap-up for some quick work with 1 Polish and 1 Pad eh?

two.5 Continue to work your way around the car in 2 ft. ten ii ft areas, reviewing your piece of work regularly with an LED torch to check if you have removed the swirling from the paintwork. ( Always buff off whatsoever remaining polish from the section you are working on, and then that you can get a clear view of the paint ) I detect information technology is better to piece of work in overlapping motions equally the below diagram shows, information technology volition help to ensure that you lot do not miss any spot.

As I worked around the car – I could definitely see a noticeable improvement in the gloss of the car and the corporeality that the paint "Popped". Nether inspection with the light, it was likewise much meliorate.

This is how information technology was looking nether direct light.

Then Far and then good! As Darkness was approaching I finished up the polishing procedure and got ready to apply some protection.

Step 3 – Protect The Car Using A Wax, Sealant or Coating of Your Choice
Subsequently spending so much fourth dimension with the motorcar polisher removing the swirls, you lot will want to protect your difficult piece of work using a quality sealant, wax or coating. This will help you to maintain your shiny end while also protecting the paintwork against the elements.
I plan to apply some sort of Ceramic Blanket to this car eventually, in one case I am 100% happy with the paint status. Until and then I am going to use something more brusque term, every bit I did not accept a whole lot of time left in the weekend after this swirl removal.
For this awarding, I decided to endeavour out a new ( to me ) product from Gyeon Quartz, chosen Wet Coat.This is a superhydrophobic coating which should repel water and add protection for upwards to 3 months. One of the reasons for choosing this in this application was how quickly I could apply it to the machine. I was able to add this layer of protection in the space of xv minutes which was ideal.
I will be posting a total review of this product soon, although I am initially very impressed with the results!

All in all, it was a weekend well spent. For anyone wondering how long it took to remove the majority of swirling from my car, I would estimate it took me between x-12 Hours Split over two Days of the weekend. ( This included all the prep piece of work and decontamination ).
To me, it was worth every minute as I am much happier with the cars finish as it is at present. It is not 100%, merely it is a massive improvement over its previous status.
I can now savour the car fifty-fifty more, and not worry about seeing the car under unflattering lighting conditions! I think the overall gloss of the vehicle is greatly enhanced also.
Here some pictures when the swirl removal was fully completed and the paint was protected.


Step 4 ( Bonus Stride ) – Keep your Auto Swirl Free
Now that you have gone to the effort of removing these defects from your paintwork, you should try to go on your auto free from dreaded swirl marks in the future.
Some Tips to Reach this
- Use a proper wash mitt and not a cheap sponge
- Use a Rubber Automobile Drying Technique with a quality microfiber towel
- Wash using a two bucket method, and comprise a grit guard into your launder buckets
- Never Dry Wipe your auto without using some lubrication ( such as a quick detailer )
There you take it, these are the bones steps y'all need to know for removing swirl marks from your car's paint, and keeping it swirl costless. If you lot have any questions please attain out to me in the comments or via email and I will do my best to answer them for you lot. To wrap up – hither are some basic tips for Polishing your Car
Motorcar Polishing Tips for Beginners
- Apply the polish offset past placing a sufficient amount on the pad so spreading it onto the car'south finish before turning the polisher on. Turning the buffer on with a big wad of polish on the pad will send the smoothen flying ( I learned this the hard way )
- Work in small-scale 2ft X 2ft Sections.
- Record off sensitive areas so you lot will not cover them in smoothen remainder
- Proceed an heart on your work using an LED calorie-free source ( Torch or similar is fine )
- Make sure that y'all keep the pad level to ensure that fifty-fifty pressure is practical ( Don't use too much pressure, as this volition not requite you lot optimal results )
- Buff the polished section until it's articulate, but stop before the polish dries
- Sling the buffer'due south cord over your shoulder to keep information technology abroad from the car'south finish – y'all don't desire to be scratching the machine at the same time y'all are fixing some other department.
- Equally the buffer is running, keep it in contact with the machine's surface and turn it off before lifting it up
- Never let the pad to come in contact with the ground. Even a single grain of clay that'southward left on the pad can go out scratches on your car'southward cease. If the pad does touch the ground, replace it or wash it thoroughly, no matter how clean it looks.
- Clean your pads in between panels, as they will brainstorm to gunk up with polish residue. This will diminish the effectiveness of the pad then it is important to continue it clean for best results
Until Next Time,
Happy Detailing!
Darren is the founder of the DriveDetailed web log and is a keen detailing enthusiast living in the rainy south of Republic of ireland. When he is non cleaning his machine he is always researching means he can improve his techniques and enjoys testing out out new products.
Darren currently drives an Audi TTRS and is a big fan of performance cars.
You can follow Darren on Instagram @darrenoharacork

Become Home
Source: https://drivedetailed.com/beginners-car-polishing-guide-how-to-remove-swirl-marks/
0 Response to "How To Remove Car Wash Swirls"
Post a Comment